
 Growing up I always looked in awe at those beautiful professionally decorated mall Christmas trees. You too? Okay let me start by sharing some really great news – you don’t have to be a pro to have a tree that looks professionally decorated! Decorating a Christmas tree with ribbon is really easy and I’m going to show you just how easy with step-by-step instructions. I promise the next Christmas tree you’ll be in awe of – will be YOURS!
Full Disclosures: This post contains affiliate links which means I receive a small commission at no additional cost to you when you click or use a link – yay!
Table of Contents
How to Decorate your Christmas Tree with Ribbon
Step 1: Start with a High-Quality (artificial) Tree
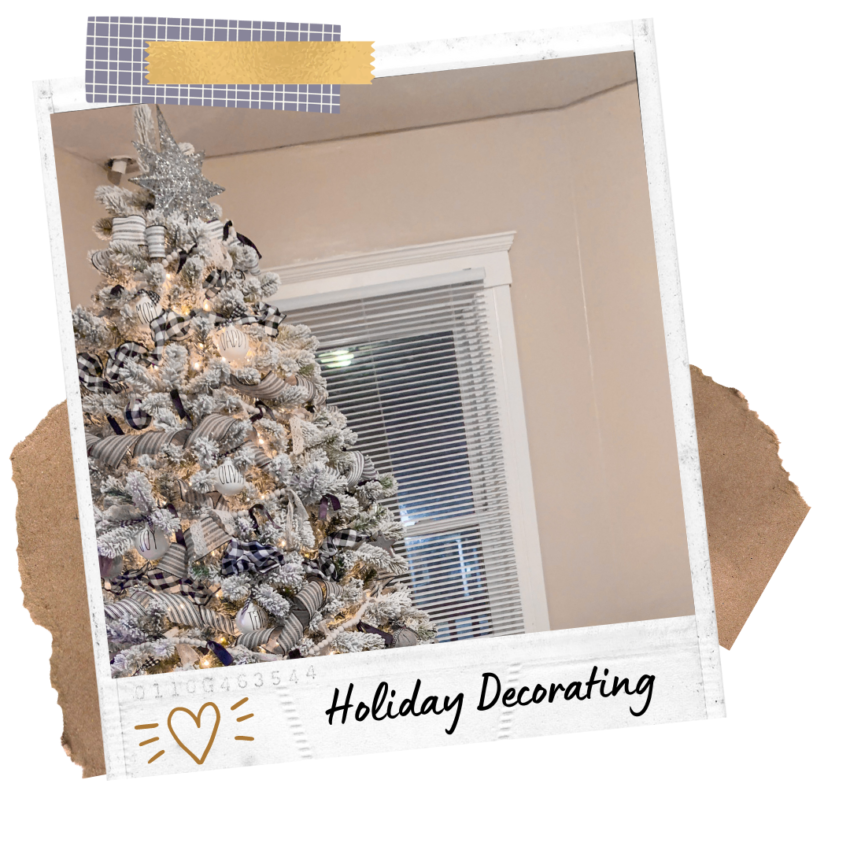
Y’all artificial trees have come a long way and can hold ornaments and decorations better than any real tree I have ever had. Plus artificial trees maintain their beauty year after year. My favorite artificial trees are from King Christmas. I have both the queen and king flocked trees. To learn more about the differences you can read my King of Christmas Tree Review. The tree you see in this post is the King Flock.
Pre-lit trees are huge time-savers as you don’t have to worry about untangling all those lights. But, on the flip side an unlit tree gives you the option of choosing what kind of lights you want on your tree.
Step 2: Fluff and Shape Branches
When it comes to artificial trees fluffing is everything! Fluffing your tree helps achieve a fuller, natural and more luxurious looking tree. Make sure to wear cotton gloves when fluffing or your hands will look like you just wrestled a cat. Seperate and fan branches ass much as possible. Then bend branches when possible to fill in gaps.
 Step 3: Pick a Theme and Color Scheme
Setting the theme of your tree will help you from spending unnecessary money on ornaments that don’t quite fit. This year I wanted a farmhouse inspired tree that fits my home decor and doesn’t feel out of place. After I chose my theme I chose my color scheme and found 3 coordinating ribbons to achieve my look.
Ribbon is THE simplest way to add visual interest. I chose a black and white buffalo check, white with black stripe and a tan with black stripe wired ribbons.
- Black and white buffalo check 4″ wide wired ribbon
- white and black stripe 2.5″ wide wired ribbon
- tan and black stripe 2.5″ wide wired ribbon
Step 4: Start with the Lights First
If you don’t have a pre-lit tree then you will need to add Christmas tree lights before adding your ribbon. I love a warm white twinkle LED lights. Look for lights that have 100 lights per 2ft.
Tree Size in ft/2 x 100 = number of bulbs needed
Doing the tree lights first makes it easier to hide the wires. This year I wanted to add tree candle lights but I forgot to add them first. I tried to add them after I put my baubles, ribbon and garland but just gave up. I was so sad – so learn from me and don’t forget the lights FIRST! Lol.
Step 5: Layer and Style Your Ribbons
Now that we got the lights taken care of – you are ready to decorate your Christmas tree with ribbon. As I mention earlier I selected 3 different color ribbons with slightly different textures. Wired ribbons are key because they make it easy to sculpt into loops or rolls. They also hold their shape longer and better than non-wired ribbons.
You can layer your ribbons by placing a slightly wider ribbon (with a different texture) underneath. I will probably do that next year but this year I kept it really basic. With your first ribbon start by going around the tree diagonally. For me this was my Buffalo Check ribbon. I tucked one end of the ribbon into the top of the tree wrapped around a branch (that will be hidden with the tree topper) and work diagonally downward. You can do this continuously but I like to cut long strips to not waste ribbon and have more placement control. Use the branches to hold the ribbon in place. After each placement take a step back…and another one…and another! Do you see where you want to place the next ribbon? Sweet! Now repeat till you get to the bottom of the tree.
Fill in remaining tree gaps by alternating the other 2 ribbons. I used 2 methods: Curl and fan method. Depending on the gap you are trying to fill, cut a piece of ribbon. Start by cutting a 12″-18″ strip of ribbon. This is a pretty descent starting size to help you gauge whether to go up or down for your next gap.
Curl Method
The curl method is just wrapping the ribbon either around your whole hand or a few fingers. Once your ribbon is curled slightly pull the center outward. Think crescent roll. Use branches to hold the curled ribbon in place. You can tighten curl or loosen the curl as needed. Make sure to tuck ribbon into the tree so it doesn’t look like its sitting on top.
Fan Method
The fan method is folding your ribbon several times to resemble a handheld fan. Press the bottom but leave the top looped. Now take the bottom and stick it into the gap you want filled. The looped edges should be showing. Now pull and manipulate as desired to fill the gap. Use nearby branches to hold ribbon in place.
How I Finished My Farmhouse Christmas Tree Look
Your tree is probably already looking pretty amazing at this point but don’t be afraid to add a few more touches like tree picks, beaded garland, ornaments…etc. To get my farmhaouse Christmas tree look here’s what I added:
Added a Beaded Garland
Ribbon on a tree is beautiful but adding a beaded garland takes it next level in my opinion. I found these natural wood colored beaded strands at Walmart. For texture and interest I added alternating pieces of vintage cream lace and black satin ribbon every 7 beads. This is where that saying, ‘the beauty is in the details’ really holds true. Play around with different ribbons that fit your theme. Have fun!
Added Christmas Ornaments
This year I used white and clear glass ornaments along with a few burlap and buffalo check ornaments for texture. I absolutely love my Rae Dunn inspired ornaments that have our names and some holiday phrases on them. If you want to support a small business and purchase a set of these awesome ornaments then head on over to Facebook Marketplace. The final ornaments are another one of my favorites as they are homemade cinnamon salt dough star shaped ornaments I make with the kids every year. They smell lovely and its a fun tradition. You can check out my recipe here.
Supplies Needed for My Farmhouse Christmas Tree
All the Farmhouse Christmas Tree supplies (or similar) I used for my tree can be found by clicking the link. The Rae Dunn inspired ornaments could be purchased from a variety of sellers on the Facebook Marketplace app.
- 4″ Black and white buffalo check wired ribbon
- 3″ White and black striped wired ribbon
- 3″ Tan and black striped wired ribbon
- Natural colored beaded garland
- 0.5″ vintage cream lace ribbon
- 0.5″ black satin ribbon
- Clear glass ornaments
- white milk glass ornaments (variety of sizes)
- Small buffalo check ornaments
- Small burlap ornaments
- Rae Dunn Inspired Ornaments
- Star topper
- Warm white LED twinkle lights
- Candle tree lights (the ones I forgot but wish I didn’t – lol!)
- Scissors
- King Flock Christmas tree (click link for $25 discount)
Considering buying an artificial tree? Read this post first: 6 Tips for Picking out an Artificial Christmas Tree